
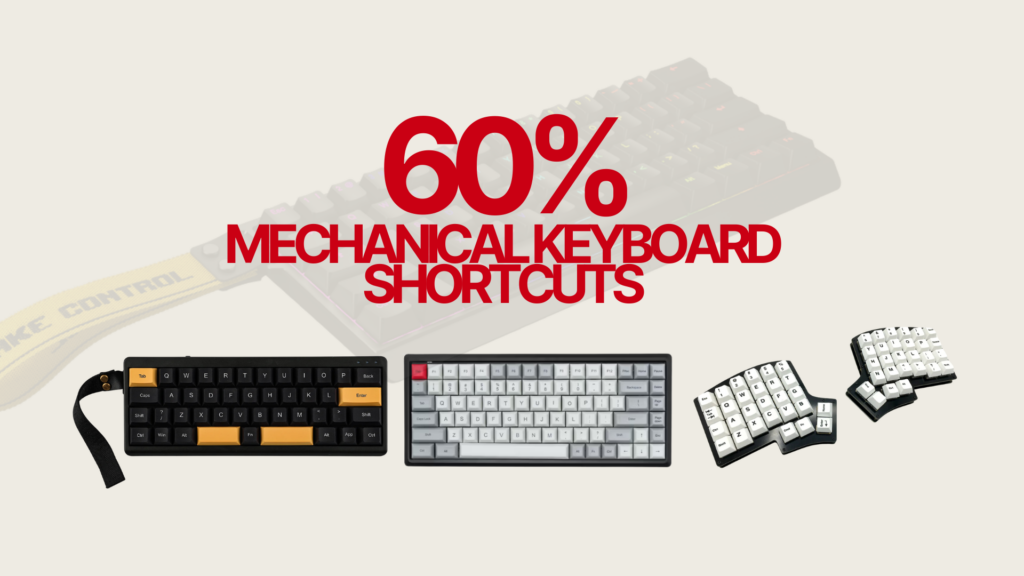
A 60% keyboard packs everything you need into 61 keys, but only if you know how to unlock the layers hiding behind the FN key. Without a function row, dedicated arrow keys, or navigation cluster, the FN layer becomes the backbone of your entire workflow. Master it and the 60% form factor becomes faster and more efficient than a full-size board. Ignore it and you’ll be reaching for keys that simply aren’t there.
- How the FN Layer Works on a 60% Keyboard
- Arrow Key Shortcuts on a 60% Keyboard
- Function Key Shortcuts (F1 – F12)
- Navigation Key Shortcuts
- Media Control Shortcuts
- System and OS Shortcuts
- Gaming Shortcuts on a 60% Keyboard
- Productivity Shortcuts for Typing and Work
- FN Lock: Keeping the Function Layer Active
- How to Customise Your FN Layer with QMK and VIA
- The Learning Curve: How Long to Master 60% Shortcuts
- 60% vs 65%: Is It Worth the Extra Keys?
- Best 60% Keyboards for Shortcut Customisation in 2026
- Quick Reference: Complete 60% Keyboard Shortcut Cheat Sheet
- Final Thoughts
This guide covers every shortcut category on a 60% keyboard: arrow keys, function keys (F1–F12), navigation, media controls, system shortcuts, and productivity combinations. It also explains how to customise your own FN layer using QMK and VIA firmware.
How the FN Layer Works on a 60% Keyboard
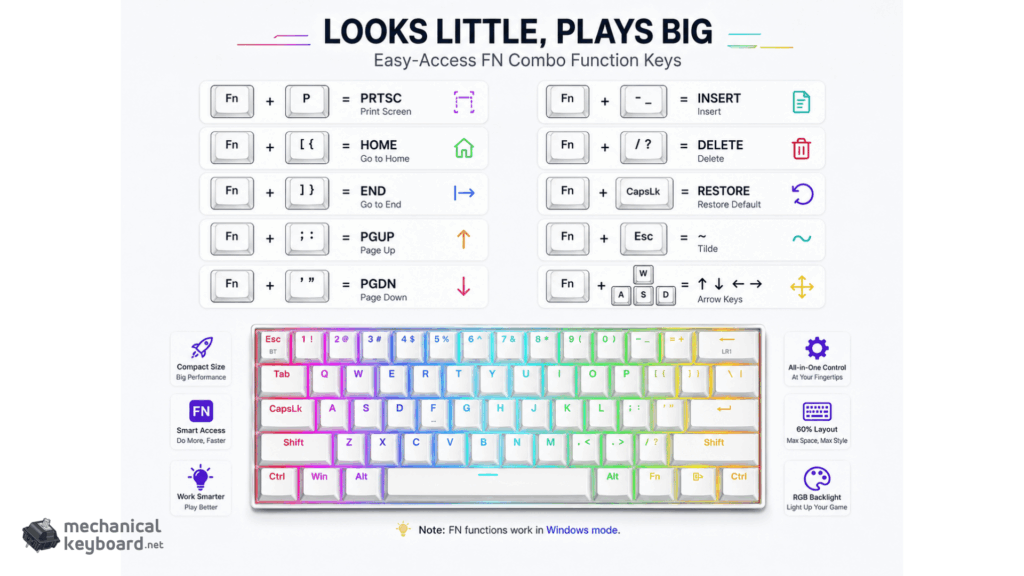
The FN key — typically found in the bottom-right modifier cluster — activates a secondary input layer when held. Every key on the keyboard takes on a different function while FN is held down. This is how a 60% board with 61 physical keys can provide access to 100+ functions.
Most 60% keyboards ship with two layers by default: the primary layer (what you see printed on the keycaps) and the FN layer (the secondary functions). Advanced firmware like QMK and VIA allows you to create additional layers beyond these two, unlocking virtually unlimited customisation. Understanding the FN layer system is the single most important skill for 60% keyboard users.
Key points to understand before diving into shortcuts:
- FN layer mappings vary by brand and firmware. The combinations listed below reflect the most common defaults across popular boards including Keychron, Anne Pro, Ducky, Royal Kludge, and Wooting. Always check your keyboard’s manual for exact mappings.
- Most boards print secondary functions on the front or side of keycaps. If your keycaps show small labels, those are your FN layer functions.
- Fn Lock lets you toggle the layer permanently. On most 60% boards, FN + Caps Lock activates Fn Lock, so function keys work without holding FN.
Arrow Key Shortcuts on a 60% Keyboard
Arrow keys are the most immediately missed feature when switching to a 60% layout. Two dominant mapping standards exist across the market: WASD-style (favoured by gamers) and IJKL-style (favoured by touch typists who prefer home-row navigation).
More Read

| Direction | WASD Mapping | IJKL Mapping | Vim-style |
|---|---|---|---|
| Up | FN + W | FN + I | FN + K |
| Down | FN + S | FN + K | FN + J |
| Left | FN + A | FN + J | FN + H |
| Right | FN + D | FN + L | FN + L |
Once you have your arrow key mapping memorised, you can combine it with modifier keys for text selection and faster navigation. These are the most useful combinations:
- Shift + FN + Arrow — Select text character by character in the arrow direction
- Ctrl + FN + Arrow — Jump word by word (left/right) or paragraph by paragraph (up/down)
- Ctrl + Shift + FN + Arrow — Select word by word
These modifier combinations work identically to dedicated arrow keys, so the workflow is exactly the same once muscle memory develops — typically within 1 to 2 weeks of daily use. For a full breakdown of how the 60% layout compares to other sizes that include dedicated arrow keys, see our mechanical keyboard sizes guide.
Function Key Shortcuts (F1 – F12)
Function keys on a 60% keyboard are almost universally mapped to the number row. This is one of the most standardised FN layer mappings across all manufacturers, making it one of the easiest to learn.
| Function Key | 60% Keyboard Shortcut | Common Use |
|---|---|---|
| F1 | FN + 1 | Help / System info |
| F2 | FN + 2 | Rename file |
| F3 | FN + 3 | Search / Find |
| F4 | FN + 4 | Address bar (browser) / Alt+F4 = close window |
| F5 | FN + 5 | Refresh / Run in IDE |
| F6 | FN + 6 | Move to address bar |
| F7 | FN + 7 | Spell check (Word / Outlook) |
| F8 | FN + 8 | Safe Mode boot / IDE step over |
| F9 | FN + 9 | Send/Receive (Outlook) / Breakpoint toggle |
| F10 | FN + 0 | Menu bar focus |
| F11 | FN + – | Full screen toggle |
| F12 | FN + = | Save As (Word) / Browser DevTools |
Some common F-key combinations that translate directly onto a 60% board:
- Alt + FN + 4 = Alt + F4 (close the active window)
- Ctrl + FN + 5 = Ctrl + F5 (hard refresh in browser)
- Ctrl + Shift + FN + 3 = Ctrl + Shift + F3 (application-specific)
For developers who use F5 to run and F9 to set breakpoints frequently, the FN layer adds cognitive overhead that you should factor into your decision. If your IDE workflow is heavily F-key dependent, a 65% or 75% keyboard may reduce friction. See our full 60% keyboard pros and cons breakdown for an honest assessment of this trade-off.
Navigation Key Shortcuts
Navigation shortcuts are where mappings diverge most significantly between manufacturers. The placements below reflect common defaults — verify against your specific keyboard’s documentation.
| Key | Common FN Mapping | Alternative Mapping |
|---|---|---|
| Delete (forward) | FN + Backspace | FN + Del (if labelled) |
| Insert | FN + I or FN + Help | FN + 0 (numpad-style) |
| Home | FN + Q or FN + ← | FN + H |
| End | FN + E or FN + → | FN + N |
| Page Up | FN + U or FN + ↑ | FN + P |
| Page Down | FN + D or FN + ↓ | FN + ; |
| Print Screen | FN + P | FN + F (Foto in German layout) |
| Scroll Lock | FN + R or FN + S | Varies |
| Pause/Break | FN + B or FN + P | Varies |
Useful navigation combos on a 60% keyboard:
- FN + Backspace — Forward delete (removes character to the right of cursor)
- Ctrl + Home — Jump to top of document (works without FN since Home row shortcut)
- Ctrl + End — Jump to bottom of document
- Shift + FN + [Home key] — Select from cursor to beginning of line
- Shift + FN + [End key] — Select from cursor to end of line
Writers and editors who rely on Home and End for line navigation adapt relatively quickly. The key insight many experienced 60% users report is that the FN layer constraint forces adoption of Ctrl+Arrow combinations, which are faster for word-level navigation than individual arrow taps anyway.
Media Control Shortcuts
Media controls are typically mapped to the home row or the row below it on most 60% keyboards. These are among the most useful FN layer functions for daily desktop use.
| Function | Common FN Mapping | Notes |
|---|---|---|
| Play / Pause | FN + ; or FN + P | Varies by board |
| Next Track | FN + ‘ or FN + ] | Often right of home row |
| Previous Track | FN + L or FN + [ | Often left of home row |
| Volume Up | FN + K or FN + = | Logical “up” positions |
| Volume Down | FN + J or FN + – | Logical “down” positions |
| Mute | FN + M | M = Mute, mnemonically consistent |
Many 60% boards with RGB also use the FN layer for lighting controls:
- FN + Right Arrow — Cycle RGB effect forward
- FN + Left Arrow — Cycle RGB effect backward
- FN + Up Arrow — Increase brightness
- FN + Down Arrow — Decrease brightness
System and OS Shortcuts
System shortcuts combine standard OS key combinations with FN layer access. These are largely unchanged from full-size keyboards — the only difference is accessing function keys through FN + number.
| Action | Windows | macOS |
|---|---|---|
| Close window | Alt + FN + 4 | Cmd + W |
| Task Manager | Ctrl + Shift + Esc | Cmd + Space → Activity Monitor |
| Screenshot | FN + P (Print Screen) | Cmd + Shift + 3 or 4 |
| Full screen toggle | FN + – (F11) | Ctrl + Cmd + F |
| Refresh page | FN + 5 (F5) | Cmd + R |
| Hard refresh | Ctrl + FN + 5 | Cmd + Shift + R |
| DevTools (browser) | FN + = (F12) | Cmd + Option + I |
| Safe boot (Windows) | FN + 8 during startup | Hold Shift during startup |
| Rename file | FN + 2 | Enter (Return) |
Gaming Shortcuts on a 60% Keyboard
The 60% is arguably the strongest gaming layout available. The vast majority of gaming inputs — WASD, surrounding keys, modifier row — are all on the primary layer with no FN layer access required during gameplay. This is why the 60% form factor dominates competitive FPS communities.
The only gaming scenarios where FN layer access might be needed mid-session are menu navigation in games that use arrow keys, or accessing F-key shortcuts in specific titles. Most competitive games never require this. For those using Hall Effect boards like the Epomaker HE80 or Wooting 60HE, the FN layer is used to access the Rapid Trigger and actuation point configuration in firmware — a one-time setup task rather than a gameplay consideration. Understanding the Hall Effect switch system helps you get the most from these boards.
| Gaming Action | On Primary Layer? | FN Required? |
|---|---|---|
| Movement (WASD) | ✅ Yes | ❌ No |
| Ability keys (Q/E/R/F) | ✅ Yes | ❌ No |
| Number row binds | ✅ Yes | ❌ No |
| Push to talk / Voice | ✅ Yes | ❌ No |
| F-key binds (scoreboard, map) | ❌ No | ✅ FN + Number |
| Menu / UI arrow navigation | ❌ No | ✅ FN + WASD/IJKL |
Productivity Shortcuts for Typing and Work
A 60% keyboard performs well for productivity once you build FN layer muscle memory. The combinations below translate directly from full-size keyboards, with FN access added only for keys that have been relocated to the layer.
Text Editing
- FN + Backspace — Delete character to the right of the cursor (forward delete)
- Ctrl + FN + [Arrow Left] — Move one word to the left
- Ctrl + FN + [Arrow Right] — Move one word to the right
- Shift + FN + [Arrow] — Select text character by character
- Ctrl + Shift + FN + [Arrow] — Select word by word
- FN + [Home] — Jump to beginning of line
- FN + [End] — Jump to end of line
- Ctrl + FN + [Home] — Jump to top of document
- Ctrl + FN + [End] — Jump to bottom of document
Browser Shortcuts
- Ctrl + T — New tab (no FN needed)
- Ctrl + W — Close tab (no FN needed)
- Ctrl + L — Focus address bar (no FN needed)
- FN + 5 — Refresh page (F5)
- Ctrl + FN + 5 — Hard refresh (Ctrl + F5)
- FN + = (F12) — Open DevTools
- Alt + FN + [Arrow Left] — Go back one page
- Alt + FN + [Arrow Right] — Go forward one page
Programming / IDE Shortcuts
- FN + 5 — Run / Debug (F5 in VS Code, IntelliJ, Visual Studio)
- FN + 9 — Toggle breakpoint (F9)
- FN + 10 — Step over (F10)
- FN + 11 — Step into (F11)
- FN + 1 — Open help / documentation (F1)
- FN + 2 — Rename symbol (F2 in VS Code)
- Shift + FN + 5 — Start without debugging
For a detailed look at switch types that work well for long typing sessions, see our guide to linear vs tactile vs clicky switches — switch choice affects both the physical feel and the acoustic character of each keystroke.
FN Lock: Keeping the Function Layer Active
If you regularly use function keys more than the primary layer functions (common for developers and power users), FN Lock lets you toggle the FN layer on permanently so you don’t need to hold FN for every access.
- Standard FN Lock toggle: FN + Caps Lock — hold both, release, FN layer stays active
- To disable FN Lock: press FN + Caps Lock again
- When FN Lock is active, pressing “1” on the keyboard sends F1, “2” sends F2, etc.
- Regular characters then require FN + number while FN Lock is on (effectively inverting the layer)
FN Lock is most useful for extended programming sessions where F-keys are the primary workflow tool, or for video editing software that uses F-keys for timeline navigation.
How to Customise Your FN Layer with QMK and VIA
The default FN layer on your 60% keyboard is a starting point, not a fixed constraint. If you have a board with QMK or VIA firmware support — which covers most enthusiast-grade 60% boards in 2026 — you can remap every key on every layer to any function you choose.
What QMK and VIA Allow You to Do
- Move arrow keys to any position that feels natural (home row, right cluster, WASD, IJKL, Vim HJKL)
- Add macro keys that trigger strings, shortcuts, or complex sequences with a single keypress
- Create dedicated application-switching layers for specific workflows
- Set tap vs. hold behaviour: a key can type one character when tapped and activate a layer when held
- Enable dual-function modifiers: Caps Lock that acts as Ctrl when held and Caps Lock when tapped
Getting Started with VIA
VIA is the easiest entry point for FN layer customisation. It runs in-browser at usevia.app and requires no firmware flashing for compatible keyboards. The interface lets you visually remap keys by clicking on the key representation and selecting a new function from a dropdown. Changes apply instantly and are stored on the keyboard’s onboard memory.
Understanding how N-Key Rollover interacts with custom key layers is also worth knowing — our NKRO guide explains how the keyboard registers simultaneous keypresses, which is relevant when building multi-key macros.
Practical Layer Layout Recommendations
| Use Case | Recommended Customisation |
|---|---|
| FPS Gaming | Arrow keys on WASD, media controls on right home row |
| Programming | Arrow keys on IJKL, Home/End on Q/E, F-keys on number row |
| Writing / Editing | Arrow keys on IJKL, Home/End/PgUp/PgDn on flanking keys |
| Video Editing | F-keys on number row, custom macros for timeline shortcuts |
| General use | Default WASD or IJKL arrows, FN + Backspace = Delete |
The Learning Curve: How Long to Master 60% Shortcuts
Adaptation to a 60% keyboard’s FN layer is not instantaneous, but it is faster than most people expect. Based on community experience and the timeline documented in our 60% keyboard guide:
| Timeframe | What to Expect |
|---|---|
| Days 1–3 | Frequent pauses to check FN layer; reaching for missing keys; some frustration |
| Days 4–10 | Arrow keys becoming automatic; F-key muscle memory building; adapting to FN + Backspace for delete |
| Weeks 2–3 | Most primary shortcuts internalised; typing speed approaching baseline |
| Month 2+ | Full fluency; FN layer access faster than reaching across a larger keyboard; potential WPM increase from reduced hand travel |
The shortcuts that take longest to internalise are those used infrequently — obscure F-key combinations for rarely-opened software, Print Screen, and Insert. For shortcuts used dozens of times per day (arrows, Delete, F5), muscle memory develops within the first week.
60% vs 65%: Is It Worth the Extra Keys?
If the arrow key and Delete key shortcuts feel like too much overhead for your workflow, the 65% layout adds those keys back while retaining nearly the same compact footprint. The 65% is roughly 3cm wider than a 60%, but gains dedicated arrow keys, Delete, and a partial navigation cluster. For anyone whose work involves heavy text editing, navigation-intensive tasks, or spreadsheet work, the 65% eliminates the main friction point of the 60% without sacrificing most of the desk space savings.
Our full mechanical keyboard sizes guide compares every form factor side by side with detailed use-case recommendations.
Best 60% Keyboards for Shortcut Customisation in 2026
Not all 60% boards offer the same level of FN layer flexibility. If shortcut customisation matters to you, these are the keyboards worth considering:
- Wooting 60HE — Full QMK support, Wootility software, Rapid Trigger, best-in-class firmware customisation for both gaming and FN layer remapping. Read more about its Hall Effect switch technology.
- Epomaker HE80 — Hall Effect switches with adjustable actuation, solid software for per-key FN layer tuning. Reviewed in detail in our Epomaker HE80 review.
- Keychron Q4 — QMK/VIA support, gasket mount, excellent typing feel. Full FN layer customisation via Keychron Launcher.
- Ducky One 3 Mini — Reliable NKRO, solid default FN layer, limited software but stable onboard programming.
- Royal Kludge RK61 — Budget option with decent FN layer defaults and software customisation support.
For switch choice on any of these boards, our mechanical keyboard switches guide covers every major switch type with specs and recommendations. If you want the deepest, most satisfying sound from your FN keystrokes, the best deep sounding switches guide has options across every price point. And for understanding the keycaps that affect how shortcuts feel and sound, see our keycaps guide.
Quick Reference: Complete 60% Keyboard Shortcut Cheat Sheet
| Category | Shortcut | Function |
|---|---|---|
| Arrow Keys | FN + W / A / S / D | Up / Left / Down / Right |
| Arrow Keys (alt) | FN + I / J / K / L | Up / Left / Down / Right |
| F-Keys | FN + 1 through FN + = | F1 through F12 |
| Delete (forward) | FN + Backspace | Delete character to the right |
| Home | FN + Q (common) | Jump to start of line |
| End | FN + E (common) | Jump to end of line |
| Page Up | FN + U or FN + ↑ | Scroll up one page |
| Page Down | FN + D or FN + ↓ | Scroll down one page |
| Print Screen | FN + P | Screenshot |
| Volume Up | FN + K or FN + = | Increase system volume |
| Volume Down | FN + J or FN + – | Decrease system volume |
| Mute | FN + M | Toggle mute |
| Play/Pause | FN + ; or FN + P | Media play/pause |
| Close Window | Alt + FN + 4 | Alt + F4 |
| Full Screen | FN + – | F11 full screen toggle |
| DevTools | FN + = | F12 browser DevTools |
| FN Lock | FN + Caps Lock | Toggle FN layer permanently |
| RGB Brightness Up | FN + ↑ | Increase backlight |
| RGB Brightness Down | FN + ↓ | Decrease backlight |
Note: Exact mappings vary by manufacturer. Always check your keyboard’s manual or printed keycap legends for your specific board.
Final Thoughts
The FN layer on a 60% keyboard is not a limitation — it is a system. Once internalised, it provides access to every function you need without moving your hands away from the home position. The shortcuts covered in this guide represent the most common default mappings across major manufacturers, but remember: with QMK and VIA, every mapping is replaceable with whatever arrangement suits your specific workflow.
If you haven’t yet decided whether the 60% is the right form factor for your workflow, start with our comprehensive 60% keyboard guide. If you’re already committed to the format, bookmark the cheat sheet above and give it two weeks of deliberate daily practice — the FN layer will become second nature before you know it.
What are the arrow keys on a 60% keyboard?
Arrow keys on a 60% keyboard are accessed via the FN layer. The most common mappings are FN + W/A/S/D (WASD-style) or FN + I/J/K/L (IJKL-style). Some boards use Vim-style HJKL. The exact mapping depends on your keyboard’s firmware and can be customised using QMK or VIA.
How do I access F1-F12 on a 60% keyboard?
Hold the FN key and press the corresponding number key: FN + 1 = F1, FN + 2 = F2, through to FN + = (equals) = F12. This is the most standardised FN layer mapping and is consistent across nearly all 60% keyboards.
How do I forward delete on a 60% keyboard?
The forward delete key (which removes the character to the right of the cursor) is typically accessed with FN + Backspace on 60% keyboards. This is one of the most commonly used FN layer shortcuts and adapts quickly with practice.
Can I customise the FN layer on my 60% keyboard?
Yes, if your 60% keyboard supports QMK or VIA firmware. VIA is the easiest option — it runs in-browser and lets you visually remap any key on any layer without flashing firmware. Changes are stored on the keyboard itself. Most enthusiast-grade 60% boards in 2026 support VIA.
What is FN Lock on a 60% keyboard?
FN Lock toggles the FN layer on permanently, so you don’t need to hold FN for every secondary function. It’s typically activated by pressing FN + Caps Lock. When FN Lock is on, pressing 1 sends F1, pressing 2 sends F2, and so on — useful for extended programming or video editing sessions.
How long does it take to learn 60% keyboard shortcuts?
Most users develop solid FN layer muscle memory within 2 to 3 weeks of daily use. Arrow keys and Delete (FN + Backspace) typically become automatic within the first week. Less frequently used shortcuts like Print Screen and Insert take longer but are rarely needed enough to cause ongoing friction.